The Java AWT: Geometry Layout
Contents
Introduction
Every graphical object shown in a Java application has a location within
the application, and a size. Toplevel objects such as
Frame, Window and
Dialog have the location and size set by preferences and by cooperation
with the window manager. All other objects, such as labels and buttons
are children of some Container object, and this object
carries responsibility for layout of its children.
A Container object does not layout its children itself.
If it did, then there would have to be a subclass of Container
for each type of layout. This subclass approach is what is used in Motif,
with different layout policies implemented in different classes such
as Form and RowColumn. Instead, Java
containers adopt a bridge approach, in which the actual layout
mechanism is left to an object implementing a
LayoutManager. Each Container has an
associated LayoutManager, and it passes layout requests
onto it. This can be changed at any time to give different layout
behaviour, but it is generally set once near creation time of the
Container.
Getting the geometry right can be difficult. I have found it very
useful to set the X resource borderWidth to a non-zero
value in a resource file while experimenting
*borderWidth: 3
Component methods
Each Component has a set of methods that are used by
layout managers.
Methods that are used to find size information are
Dimension minimumSize();
Dimension preferredSize();
Dimension size();
minimumSize() gives the smallest size that a
Component wishes to be. This is often calculated using
native toolkit information. For example, for a Button the
width is given as the width of the label plus 14 pixels, and the
height as the height of the label plus 8 pixels.
The preferredSize() is usually just set to the
minimumSize().
A LayoutManager may force any size it wants, and the
actual size is given by the size() method.
In many toolkits, when an object wishes to resize itself, it sends
a message to its parent which will then enter a geometry negotiation
session. AWT does not do this. Each Component object
has a field valid of type boolean.
When false it means that it needs to be layed out.
After layout, it is reset to true. An object can set
this field itself, or it can be set by the methods validate()
and invalidate(). For example, when the label is reset in
a Button its sets the field to false because
the length of the label will probably have changed.
Note that when an object is invalid no automatic geometry negotiation
takes place. For example, if the label of a Button is
changed the Button doesn't change size. Instead, if
the label is too long then it will just be truncated.
Laying out objects
When the method layout() is called on a Container
it will ask its LayoutManager to perform the layout.
For example, suppose we have a Button with a label that may
change size, and we want to force a recalculation of size each time it
does.
Each time the label is changed in a Button it invalidates itself.
We can force the recalculation by defining a subclass of Button
that overrides setLabel() by calling layout()
on its parent:
class AutoResizeButton extends Button {
    public setLabel(String label) {
	super.setLabel(label);
	Container parent = (Container) getParent();
	parent.layout();
    }
}
Note that this only resizes the Button within its
parent. If the Container should really grow to satisfy the
request it does not invalidate itself and ask its parent to also resize.
Instead, it makes do with the size it has. So resize requests do not
pass upwards without extra work: one could subclass layout managers
so that they perform this check, and also subclass the containers
so that if they can't contain their objects then they ask for a resize.
This is not done for you.
Standard layout managers
AWT supplies a number of layout managers for use. They are
-
BorderLayout - NSEW layout
-
FlowLayout - left-to-right with overflow
-
GridLayout - regular rectangular grid
-
GridBagLayout - general gridded layout
-
CardLayout - allows "flipping" through a set of "cards"
A layout manager may be set for a container using the method
setLayout(). Any old manager will eventually be
garbage collected.
When an object is added to a Container there are
two methods available:
add(Component);
add(String, Component);
Which of these methods is used depends on the layout manager:
for the first method add(Component) the object
is added to the Container and its layout manager
is not informed about this.
For the second method add(String, Component)
the layout manager is informed, and uses the string to
identify the location of the object (like BorderLayout
uses values like North to locate objects).
The BorderLayout and CardLayout
managers require the two parameter version, whereas
FlowLayout, GridLayout and
GridBagLayout require the one parameter version.
If you use the wrong version, the toolkit does not inform you -
no error has occurred to the Java system. However, you may get
obscure and incorrect runtime behaviour.
Insets object
An Insets object has four fields: left,
right, top and bottom.
This is intended for leaving an internal area within a Container,
for such things as menubars, or just to provide some spacing.
A Container has a method insets() to return
the current Insets used by it. In fact, the Insets
object is managed by the Container's peer, since such things as
internal border widths are implementation dependant.
A Frame's peer maintains an Insets with
default values of top = 25,
bottom = right = left = 5,
and so does a Dialog. A Window has an
Insets with all values equal to zero.
A Panel's peer does not save an Insets,
and each time one is requested it returns a new one with values equal
to zero. This means that for each of Frame,
Dialog and Window, requesting inset()
returns the actual Insets object. Presumably one can set
fields of this if desired. On the other hand, there is no point setting
values for Panel. A CardLayout object has no
associated peer object, and does not use an Insets object.
BorderLayout
BorderLayout is the default manager for Frame,
Window and Dialog.
A BorderLayout manager will manage upto five children,
in positions of "North", "South", "East", "West" and "Center".
A simple program to perform this is
import java.awt.*;

public class TestBorderLayout extends Frame {

    public static void main(String argv[])
    {
	new TestBorderLayout().show();
    }

    TestBorderLayout()
    {
	add("West", new Button("West"));
	add("East", new Button("East"));
	add("South", new Button("South"));
	add("North", new Button("North"));
	add("Center", new Button("Center"));
	resize(400, 200);
    }
}
This looks like
As can be seen, the North and South components stretch the width
of the container (less the left and right values of the Insets
object).
Their height is the preferredSize().height
of the component. The West and East components stretch for the remaining
height. Their width is the preferredSize().width.
The Center component occupies the rest of the space, and has no say
over its size.
If you are running a Java-enabled browser, you can experiment
with the width and
height of the layout in the following program:
(The source code for this applet is
here
.)
It may be that the use of the preferred sizes is not what is desired
for your application. For example, you may wish to have a Button
with height twice that of normal. A way to do this is to define a
subclass of Button with the preferredSize()
method overridden:
class BigButton extends Button {
    BigButton(String label) {
	super(label);
    }

    public Dimension preferredSize() {
	Dimension s = super.preferredSize();
	s.height *= 2;
	return s;
    }
}
The size of the Center object is determined completely by the
BorderLayout, which makes it fill the remaining space.
A common use of this is when you have a Label to the
left of a TextField, where the Label must stay
at a fixed size and the TextField occupy the remaining
space. This can be done by making the Label a "West"
object and the TextField a "Center" object:
class LabelledTextField extends Panel {
    Label label;
    TextField text;

    public LabelledTextField(String l, int cols) {
	setLayout(new BorderLayout());
	label = new Label(l);
	text = new TextField(cols);
	add("West", label);
	add("Center", text);
    }

    public String getText() {
	return text.getText();
    }
}
FlowLayout
FlowLayout is the default layout manager for Panel
and Applet.
With FlowLayout, objects are laid left to right in the order
that they were added to the container. If there is not enough room in any row,
then they overflow onto the next row.
A program to lay out four buttons with this layout manager is
import java.awt.*;

public class TestFlowLayout extends Frame {
    public static void main(String argv[])
    {
	new TestFlowLayout().show();
    }

    TestFlowLayout()
    {
	setLayout(new FlowLayout());

	add(new Button("Button 1"));
	add(new Button("Button 2"));
	add(new Button("Button 3"));
	add(new Button("Button 4"));
	resize(400, 100);
    }
}
This looks like
If you are running a Java-enabled browser, you can experiment
with the width and
height of the layout in the following program:
(The source code for this applet is
here
.)
Try setting the width in various multiples of 100 to force a change
in the number of columns used - on one of my machines, 100 forces
one column, 200 allows two columns while 300 is four columns.
The default alignment is to center the objects, both vertically and
horizontally. Here they are all the
same size, so appear regularly positioned. If different size objects
are chosen they appear in their preferred sizes, centered as much as
possible:
import java.awt.*;
import java.applet.*;

public class TestFlowApplet2 extends Applet {

    public TestFlowApplet2() {
	setLayout(new FlowLayout());

	add(new Button("Button"));
	add(new Button("A very long Button name"));
	add(new Button("Button"));
	add(new TextArea("TextArea with some text", 4, 50));
	resize(400, 100);
    }
}
This looks like
If you are running a Java-enabled browser, you can experiment
with the width and
height of the layout in the following program:
(The source code for this applet is
here
.)
The alignment can be changed by using a different constructor. For example,
to set the alignment to left, use the constructor
FlowLayout(FlowLayout.LEFT)
The places objects from the left. Similarly, they can be aligned from
the right. They are still centered vertically, and it is not possible
to change this.
The horizontal and vertical gap between objects
can also be set in constructors.
GridLayout
GridLayout sets out objects in a regular array. The
objects are laid from left to right in the order in which they
were added to their container. The GridLayout
constructor specifies the number of rows and columns. The horizontal
and vertical gap between objects can also be specified in a
constructor. For example, four buttons in 2x2 grid are laid
out by
import java.awt.*;

public class TestGridLayout extends Frame {
    public static void main(String argv[]) {
	new TestGridLayout()show();
    }

    TestGridLayout() {
	setLayout(new GridLayout(2, 2));

	add(new Button("Button 1"));
	add(new Button("Button 2"));
	add(new Button("Button 3"));
	add(new Button("Button 4"));
	resize(400, 200);
    }
}
The width and height of each object is the same, and is set by the
manager.
This looks like
If you are running a Java-enabled browser, you can experiment
with the width and
height of the layout in the following program:
(The source code for this applet is
here
.)
The number of rows and columns must be set at constructor time.
There is, of course, a good chance that this might not be the
actual number of objects in the container - there is nothing to enforce
equality.
The layout manager calculates how many rows and columns to use from
the original specification and the actual number of objects, by
int nrows = rows;
int ncols = cols;

if (nrows > 0) {
    ncols = (ncomponents + nrows - 1) / nrows;
} else {
    nrows = (ncomponents + ncols - 1) / ncols;
}
This can lead to some strange results. For example, if you have four
objects and specify two, three or four rows then you get two columns.
The extra rows are left empty (they still count for the size
calculations, though). However, with four objects and five or more
rows specified, then the number of columns is reduced to one only,
and only one column is used for size calculations! If there are more
objects than are actually specified, then the number of columns is
increased to allow for this. The total number of rows is fixed for
all cases, and this number of rows will show, even if some of them
are empty.
This picture is reversed if the number of rows is negative. Then
the number of columns is fixed and the number of rows may vary.
The special case of both rows and columns set to zero is trapped
and throws an exception.
CardLayout
CardLayout is different to the other layout managers
in that it controls the visibility of objects rather
than controlling their size per se. It only shows one
object at a time, with methods to move backwards and forwards
through the list of objects, to the beginning or to the end of the
list. It can also show a particular object. The methods are
void next(Container);
void previous(Container);
void first(Container);
void last(Container);
void show(Container, String);
This is the only one of the standard layout managers that has methods
to manipulate it after creation. Thus it either needs to be stored
or be accessed by the container method getLayout().
A program to show one of four buttons and cycle between them is
import java.awt.*;

public class TestCardLayout extends Frame {
    public static void main(String argv[]) {
	new TestCardLayout();
    }

    public TestCardLayout() {
	setLayout(new CardLayout());

	add("1", new NextButton("Btn 1"));
	add("2", new NextButton("Btn 2"));
	add("3", new NextButton("Btn 3"));
	add("4", new NextButton("Btn 4"));
	resize(200, 100);
	show();
    }
}

class NextButton extends Button {
    NextButton(String name) {
	super(name);
    }
    public boolean action(Event evt, Object what) {
	Container cont = (Container) getParent();
	CardLayout card = (CardLayout) cont.getLayout();

	if (getLabel().equals("Btn 4")) {
	    card.first(cont);
	} else {
	    card.next(cont);
	}
	return true;
    }
}
This looks like
The add() method used for CardLayout takes
two parameters, a String and a Component.
The actual value of the string does not matter, but it should be
unique among all the components handled by this manager.
This is used by the method show() which takes the
string as argument and returns the corresponding component.
GridBagLayout
GridBagLayout is the most flexible of the layout managers,
and by far the most complicated. It allows arbitrary arrangements
of objects in a grid, where the objects need not all be the
same size. This complexity really needs to be dealt with in a separate
article, so this manager is discussed in detail in the next issue of
the X Advisor.
Other Layout Managers
It is possible to build layout managers apart from the ones supplied
by Sun. Layout managers are built entirely in Java, so they can be
used both for applets and applications - there is no need for a
native code implementation since enough information is supplied
by Component methods. Building a layout manager is
discussed further in the next section.
Users of other toolkits are familiar with layout managers belonging
to those toolkits. A layout manager with the ability
to handle complex geometric arrangements usually takes some time
to learn and learn to exploit properly. The effort required to
learn a new, complex manager may not seem worth it.
This is particularly true with GridBagLayout,
partly because the early documentation from Sun was very weak
on this manager.
This section briefly discusses two layout managers for which
the code is publically available. The first is a Packer layout,
based on the Tk packer, written by Daeron Meyer and
available from
http://www.geom.umn.edu/~daeron/apps/ui/pack/gui.html
The second is a Fractional layout, similar to VisualWorks,
written by Eric Lunt and available from
http://www.mcs.net/~elunt/Java/FractionalLayoutDescription.html
PackerLayout
The tcl/Tk toolkit contains a layout manager called the "packer".
With the packer you add objects to a particular side, of "left",
"top", "bottom" or "right".
When an object is added to one of these sides it carves off a
complete side of the remaining space. For example, adding an
object to the "left" results in the object being given
a rectangle equal in height to the remaining space, with
width equal to the preferred size of the object.
Successive requests shrink the remaining available space.
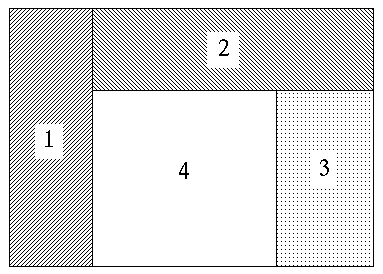
For example, if a request is made for space from the left, then the
top, then the right, the area shown as "4" is still available
for packing.
The PackerLayout object uses
the two-parameter method of add(String, Component)
to identify an order of placing objects in the packer.
The string gives an object name "button1", "button2", etc
to identify this order. In addition it uses this string to pass
in other information such as the side.
A simple example adding three objects to the left is
import java.awt.*;
import PackerLayout;

public class FromLeft extends Frame {
    public static void main(String argv[]) {
	new FromLeft().show();
    }

    FromLeft() {
	setLayout(new PackerLayout());
	add("button1;side=left", new Button("Left"));
	add("button2;side=left", new Button("Middle"));
	add("button3;side=left", new Button("Right"));
	resize(200,200);
    }
}
There are many other features of the Tk packer that have been
implemented for the PackerLayout class: one can
set the amount of "fill" of the space, the orientation
within this space, and padding. This information is all
encoded in the string argument to add().
This is only a thumbnail overview of the PackerLayout
class. Tk afficiandos will no doubt leap at using this class rather
than go through the trauma of understanding the
GridBagLayout class!
FractionalLayout
The FractionalLayout class allows you to layout
objects in positions such as "half way across, and a third
of the way down". It also allows you to specify exactly
which part of the object is to appear in this position.
A simple use of this is to specify that an object is to appear
exactly in the middle of the available space: halfway across
the object, halfway down the object appears at a location
halfway across the space, halfway down the space.
The FractionalLayout manager uses the
add(Component) method to add the component to its
container. The layout manager gets no specific information about
the component from this. However, to locate objects by position
the manager needs to know the position information.
While the PackerLayout was given extra information
in the string argument to add(String, Component),
FractionalLayout uses a method borrowed from
GridBagLayout: it encodes this information in a
constraint object and then gives the manager this
information by the method
setConstraint(Component, OriginConstraint).
The manager stores this information and uses it when it has to
calculate the layout.
This layout manager recognises that there are two common ways of
specifying position: as a fraction of the height or width,
or as an absolute pixel value.
This information is placed in the constraint object.
For example, the OriginConstraint object allows
the top-left corner of an object to be set.
One of the constructors for this class is
OriginConstraint(
	double leftFraction,
	int leftOffset,
	double topFraction,
	int topOffset)
This allows a constraint to specify values such as "10 pixels to the
right of half-way across" by
new OriginConstraint(0.5, 10, ...)
Other constraint classes within this manager allow you to also specify
positions within the component itself
AlignmentOriginConstraint, or to force the component
to fill a frame specified within the container
FrameConstraint.
For example, centering a TextField within a container
would be done by
	TextField text = new TextField();
	add(text);

	FractionalLayout layout = new FractionalLayout();
	setLayout(layout);

	AlignmentOriginConstraint constraint =
		new AlignmentOriginConstraint(
			0.5, // left fraction of container
			0,   // left offset in container
			0.5, // top fraction of container
			0,   // top offset in container
			0.5, // left fraction of component
			0.5  // top fraction of component
		);
	layout.setConstraint(text, constraint);
Building your own Layout Manager
Although there are many layout managers available, you may still need
to build your own for a particular purpose. LayoutManager
itself is specified as an interface, so building your own manager
means defining constructors and implementing the methods of the
interface. The methods are
void addLayoutComponent(String name, Component comp);
void removeLayoutComponent(Component comp);
Dimension preferredLayoutSize(Container parent);
Dimension minimumLayoutSize(Container parent);
void layoutContainer(Container parent);
Some managers need to be specifically informed about the objects that
they will manage. For example, BorderLayout needs to know
which object is "North", etc. These managers will need a non-empty
implementation of addLayoutComponent() and
removeLayoutComponent(). These methods are called from
the container's add(String, Component) and
remove(Component) respectively.
Other managers such as GridLayout just rely on
getting the list of components from the container (using
countComponents(), getComponent() and
getComponents()). Such managers can use an empty
implementation of addLayoutComponent() and
removeLayoutComponent()
The preferredLayoutSize() and
minimumLayoutSize() methods must return a
Dimension object specifying the size needed.
Generally this will be calculated from all of the components
managed, along with any inter-object gaps and the Insets
object.
layoutContainer() is the method that actually performs the
layout. It is responsible for placing and sizing the component objects,
using methods such as move(int x, int y),
resize(int width, int height) and
reshape(int x, int y, int width, int height).
For an example of building a layout manager, we shall choose a simple
manager. If you have been viewing this article using a Java-aware
browser, then some of the examples have allowed you to set sizes
of containers so that you can observe the way that the layout
managers handle various sizes. This was done using a layout manager
that only manages one object and can set its size to values
specified from methods. This manager has the following methods in addition
to those of LayoutManager:
SizeLayout(); // constructor
SizeLayout(Dimension); // constructor
void setSize(Dimension);
Dimension getSize();
The manager can determine what it is managing by looking at the container.
So the methods addlayoutComponent() and
removeLayoutComponent() can be empty.
The methods preferredLayoutSize()
and minimumLayoutSize() need just find the size
of the contained component and return this (with adjustment for
the Insets
object). The method layoutContainer() will
reshape() the object.
class SizeLayout implements LayoutManager {
    Dimension size;

    public SizeLayout() {
	size = new Dimension(0, 0);
    }

    public SizeLayout(Dimension s) {
	size = s;
    }

    public void setSize(Dimension s) {
	size = s;
    }

    public Dimension getSize() {
	return size;
    }

    public void addLayoutComponent(String n, Component c) {
    }

    public void removeLayoutComponent(Component c) {
    }

    public Dimension preferredLayoutSize(Container parent) {
	Insets insets = parent.insets();
	int width = insets.left + insets.right;
	int height = insets.top + insets.bottom;

	if (parent.countComponents() == 0)
	    return new Dimension(width, height);

	// use the first component added
	Component c = parent.getComponent(0);
	Dimension d = new Dimension(c.preferredSize());
	d.width += width;
	d.height += height;
	return d;
    }

    public Dimension minimumLayoutSize(Container parent) {
	Insets insets = parent.insets();
	int width = insets.left + insets.right;
	int height = insets.top + insets.bottom;

	if (parent.countComponents() == 0)
	    return new Dimension(width, height);

	// use the first component added
	Component c = parent.getComponent(0);
	Dimension d = new Dimension(c.minimumSize());
	d.width += width;
	d.height += height;
	return d;
    }

    public void layoutContainer(Container parent) {
	if (parent.countComponents() == 0)
	    return;
	Insets insets = parent.insets();

	// use the first component added
	Component c = parent.getComponent(0);
	c.reshape(insets.left, insets.top, size.width, size.height);
	c.validate();
    }
}
Conclusion
This article has discussed some of the layout managers available as
part of AWT. For those who may have other requirements it has also
looked at some other layout managers available on the Internet, and
has also discussed what you have to do to build your own manager.
The most complex manager - the GridBagLayout
manager - will be discussed in the next article.