Swing tutorial part 2
Jan Newmarch
GEOMETRY
Panel
- Panel is a general purpose container
used to give geometric structure
to an application
- Panels can be nested
Geometry
-
Geometry controls the initial placement of objects on the screen, and their
behaviour under internal or external resizing
-
Under X, to see clearer what is happening in examples, set the resource
*borderWidth: 3
in your resource files
-
Geometry is identical for AWT and Swing components
Size Calculations
-
minimumSize() is set by the object's native
implementation peer for AWT objects e.g.
MButtonPeer sets minimumSize() as label
width + 14, label height + 8.
- For Swing objects, it is set by its UI component (which
is the Java equivalent to the peer)
-
preferredSize() usually defaults to
minimumSize()
Geometry Calculations
-
Changing the preferred size of an object does not change its size,
or trigger any geometry negotiation e.g. resetting the label of a Button
does not change the size
-
Changing the preferred size of an object automatically
invalidates it.
-
To force a size recalculation for invalid children of
a Container call
layout() on the Container.
This will force a resize each time the label is reset:
class AutoResizeButton extends Button {
  public void setLabel(String name) {
    super.setLabel(name);
    getParent().layout();
  }
}
Insets and Layout Objects
-
An inset gives a top, bottom, left and right border within which a Container
lays out its contents.
-
Insets should probably be treated as readonly
-
Geometry layout is done by an associated Layout object
-
Layout objects include
-
BorderLayout - NSEW layout
-
FlowLayout - left-to-right with overflow
-
GridLayout - regular rectangular grid
-
GridBagLayout - general gridded layout
-
CardLayout allows ``flipping'' through a set of ``cards''
BorderLayout
-
Objects are added to the "North", "South", "West", "East" or "Center"
-
Safer programs may use BorderLayout.NORTH, etc
(compiler catches errors)
-
This is the default layout for Frame
-
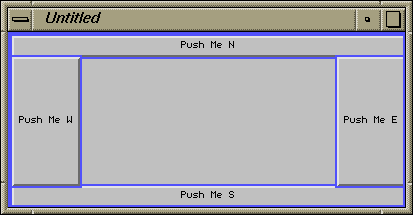
An example program is
BorderLayout (2)
import java.awt.*;

class TestBorderLayout extends Frame {
  TestBorderLayout()
  {
    add(new Button("Push Me W"),
            BorderLayout.WEST);
    add(new Button("Push Me E"),
            BorderLayout.EAST);
    add(new Button("Push Me S"),
            BorderLayout.SOUTH);
    add(new Button("Push Me N"),
            BorderLayout.NORTH);
    setSize(400, 200);
    setVisible(true);
  }
}
BorderLayout (3)
-
If there is a North component it stretches the full width (less the
inset's left and right).
-
The height of the North component is its
preferredSize().height.
-
If there is a South component it stretches the full width (less the
inset's left and right), with height its
preferredSize.height().
-
If there is a West component it fills the vertical space after the
inset's top and bottom and the heights of the North and South components.
-
The width of the West component is its
preferredSize.width().
-
Similar for the East component.
-
The Center component is forced to fill the remaining space
FlowLayout
-
Install this by
setLayout(new FlowLayout())
-
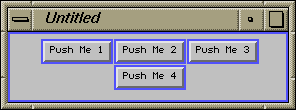
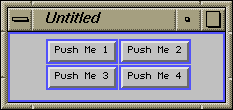
Elements are laid out from left to right (centered),
with overflow onto the next row
-
An example is

FlowLayout (2)
TestFlowLayout()
{
  setLayout(new FlowLayout());

  add(new Button("Push Me 1"));
  add(new Button("Push Me 2"));
  add(new Button("Push Me 3"));
  add(new Button("Push Me 4"));
  setSize(400, 100);
  setVisible(true);
}
FlowLayout (3)
The same layout after resizing
GridLayout
-
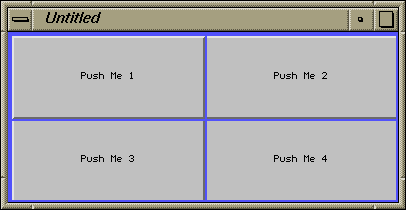
Gridlayout is a rectangular grid each of the same size
-
There are two constructors
GridLayout(int rows, int cols)
GridLayout(int rows, int cols,
	   int hgap, int vgap)
-
Elements are added by rows
GridLayout (2)
GridLayout (3)
    TestGridLayout()
    {
	setLayout(new GridLayout(2, 2));

	add(new Button("Push Me 1"));
	add(new Button("Push Me 2"));
	add(new Button("Push Me 3"));
	add(new Button("Push Me 4"));
	setSize(400, 200);
	setVisible(true);
    }
GridBagLayout
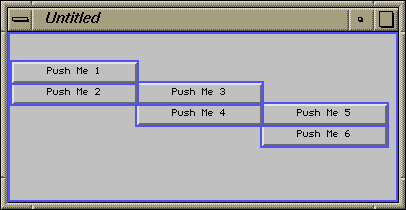
GridBagLayout: Direction of Addition
-
The GridBagConstraints
gridx and gridy control
placement of objects
-
gridx and gridy can set
absolute positions from (0,0)
in the topright corner
-
If
gridx == RELATIVE add in row order i.e.
to the right of the last component or in the next row if it was the
last of the row
-
If
gridy == RELATIVE add in column order
-
The default (both
RELATIVE) is row order
-
The direction can be changed for each object
GridBagLayout: Direction of Addition (2)
GridBagLayout: Direction of Addition (3)
import java.awt.*;

public class GridBagDirection extends Frame {
    Button btn1, btn2, btn3,
	   btn4, btn5, btn6;
    GridBagLayout gridbag;
    GridBagConstraints c;

    public static void main(String argv[])
    {
	new GridBagDirection();
    }
GridBagLayout: Direction of Addition (4)
void init() {
    gridbag = new GridBagLayout();
    setLayout(gridbag);

    c = new GridBagConstraints();
    c.weightx = 1.0;
    c.fill = GridBagConstraints.BOTH;

    makeButtons();
}
GridBagLayout: Direction of Addition (5)
void makeButtons() {
    btn1 = new Button("Push Me 1"); add(btn1);
    btn2 = new Button("Push Me 2"); add(btn2);
    btn3 = new Button("Push Me 3"); add(btn3);
    btn4 = new Button("Push Me 4"); add(btn4);
    btn5 = new Button("Push Me 5"); add(btn5);
    btn6 = new Button("Push Me 6"); add(btn6);
}
GridBagLayout: Direction of Addition (6)
GridBagDirection()
{
   init();

   gridbag.setConstraints(btn1, c);

   // btn2 below btn1
   c.gridx = 0;
   c.gridy = GridBagConstraints.RELATIVE;
   gridbag.setConstraints(btn2, c);

   // more coming ...
GridBagLayout: Direction of Addition (7)
   // btn3 right of btn2
   c.gridx = GridBagConstraints.RELATIVE;
   c.gridy = 1;
   gridbag.setConstraints(btn3, c);

   // btn4 below btn3
   c.gridx = 1;
   c.gridy = GridBagConstraints.RELATIVE;
   gridbag.setConstraints(btn4, c);

   // more coming ...
GridBagLayout: Direction of Addition (8)
   // btn5 right of btn4
   c.gridx = GridBagConstraints.RELATIVE;
   c.gridy = 2;
   gridbag.setConstraints(btn5, c);

   // btn6 below btn5
   c.gridx = 2;
   c.gridy = 3; // absolute, for variety
   gridbag.setConstraints(btn6, c);

   setSize(400, 200);
   setVisible(true);
}
GridBagLayout: Cell Size Requests
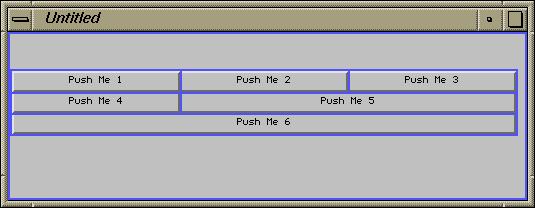
-
Each component occupies one horizontal cell and one vertical cell by default
-
gridwidth and gridheight of GridBagConstraints can be set to
alter this
-
A
gridwidth value of REMAINDER makes this the last in the row
-
A
gridheight value of REMAINDER makes this the last in the column
GridBagLayout: Multiple Rows
GridBagLayout: Multiple Rows (2)
GridBagMultiRow()
{
   GridBagLayout gridbag =
                 new GridBagLayout();
   setLayout(gridbag);
   GridBagConstraints c =
                 new GridBagConstraints();
   c.weightx = 1.0;
   c.fill = GridBagConstraints.BOTH;

   // three in one row
   gridbag.setConstraints(btn1, c);
   gridbag.setConstraints(btn2, c);
   c.gridwidth = GridBagConstraints.REMAINDER;
   gridbag.setConstraints(btn3, c);
GridBagLayout: Multiple Rows (3)
   // two in one row
   c.gridwidth = 1;
   gridbag.setConstraints(btn4, c);
   c.gridwidth = GridBagConstraints.REMAINDER;
   gridbag.setConstraints(btn5, c);

   // row by itself
   c.gridwidth = GridBagConstraints.REMAINDER;
   gridbag.setConstraints(btn6, c);

   setSize(600, 300);
   setVisible(true);
}
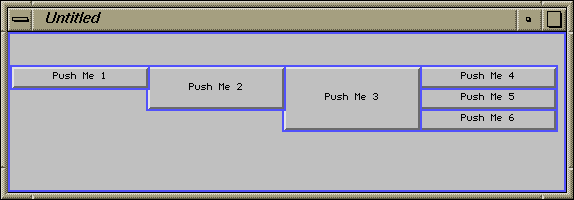
GridBagLayout: Cell Size Granting
-
A request for a cell height of n
will be the minimum of n
and the number
of remaining rows requested by
gridwidth == REMAINDER
-
A request for a cell width of n will be the
minimum of n
and the number
of remaining columns requested by
gridheight == REMAINDER
Denied Request
Only one row, so height can't be greater than one
   GridBagHeightDenied()
   {
      // all height requests ignored
      gridbag.setConstraints(btn1, c);
      c.gridheight = 2;
      gridbag.setConstraints(btn2, c);
      c.gridheight = 3;
      gridbag.setConstraints(btn3, c);
      c.gridheight = 4;
      gridbag.setConstraints(btn4, c);
      c.gridheight = 5;
      gridbag.setConstraints(btn5, c);
      gridbag.setConstraints(btn6, c);
   }
}
Accepted Request
Accepted Request (2)
GridBagHeightAccepted()
{
   gridbag.setConstraints(btn1, c);
   c.gridheight = 2;
   gridbag.setConstraints(btn2, c);
   c.gridheight = 3;
   gridbag.setConstraints(btn3, c);
   // these all end rows
   c.gridheight = 1;
   c.gridwidth = GridBagConstraints.REMAINDER;
   gridbag.setConstraints(btn4, c);
   gridbag.setConstraints(btn5, c);
   gridbag.setConstraints(btn6, c);
}
GridBaglayout: Resizing
-
weightx and weighty control resize behaviour
-
A weight of zero is no resize
-
Weights greater than zero resize proportionately
GridBaglayout: Fill
-
fill controls how a Component fills a space larger than its preferred size
-
values are NONE (default), HORIZONTAL, VERTICAL, BOTH
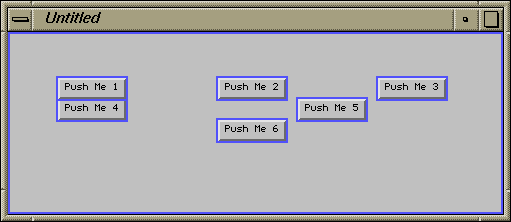
GridBaglayout: Anchors
-
anchor controls where a Component is placed in a cell it doesn't fill
completely
-
Values are CENTER (default), NORTH, NORTHEAST, etc
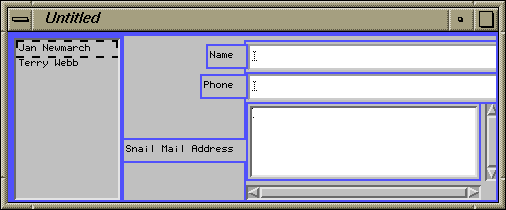
A Complex Layout
A Complex Layout (2)
 GridBagConstraints c = new GridBagConstraints();
 c.weightx = 0.0;
 c.anchor = GridBagConstraints.EAST;

 GridBagConstraints c2 = new GridBagConstraints();
 c2.gridwidth = GridBagConstraints.REMAINDER;
 c2.weightx = 1.0;
 c2.fill = GridBagConstraints.HORIZONTAL;

 gridbag.setConstraints(nameL, c);
 gridbag.setConstraints(nameT, c2);
 gridbag.setConstraints(phoneL, c);
 gridbag.setConstraints(phoneT, c2);
 gridbag.setConstraints(addressL, c);
 gridbag.setConstraints(addressT, c2);
CardLayout
CardLayout (2)
Flip through Btn1 - Btn4 circularly
import java.awt.*;
import java.awt.event.*;

public class TestCardLayout extends Frame
             implements ActionListener {
    public static void main(String argv[])
    {
	new TestCardLayout();
    }
    TestCardLayout()
    {
	setLayout(new CardLayout());

	addButton("1");
	addButton("2");
	addButton("3");
	addButton("4");

	setSize(200, 100);
	show();
    }
    protected void addButton(String key) {
	Button btn = new Button("Btn " + key);
	add(btn, key);
	btn.addActionListener(this);

    }

    public void actionPerformed(ActionEvent e) {
	CardLayout card = (CardLayout) getLayout();

	if (e.getActionCommand().equals("Btn 4")) {
	    card.first(this);
	} else {
	    card.next(this);
	}
    }
}
MENUS
Menus
-
All menu components are subclassed from MenuComponent (MenuBar, Menu,
MenuItem, CheckboxMenuItem).
-
Menus are pulldown (1.0) or popup as well (1.1)
-
Menus can be changed by the setMenu() of Frame.
This unmaps the old menu and maps the new one
-
For applets, you need to walk up the window tree to find a Frame,
just as with Dialogs
MenuBar
-
MenuBar provides a horizontal bar containing menu selections
-
Pulldown menus hang from there
-
It is added to Frame by Frame's method setMenu(MenuBar)
Menu
MenuItem and CheckboxMenuItem
-
MenuItem is an ordinary selection element
-
A MenuItem with name ``-'' is a separator
-
In Java 1.1 a constructor allows a ``hot-key'' to be associated
with a MenuItem
-
CheckboxMenuItem can be set to on or off
Menu Example
private void CreateMenu()
{
   MenuBar mb = new MenuBar();
   Menu fileB = new Menu("File");
   mb.add(fileB);

   MenuItem newB = new MenuItem("New");
   MenuItem quitB = new MenuItem("Quit");
   fileB.add(newB); fileB.add(quitB);

   Menu editB = new Menu("Edit");
   mb.add(editB);

   setMenuBar(mb);
}
Menu selection handling
-
Menu selection has changed to the delegation model too
-
A click on MenuItem is handled by an ActionEvent listener
DIALOGS
Dialogs
About Dialog
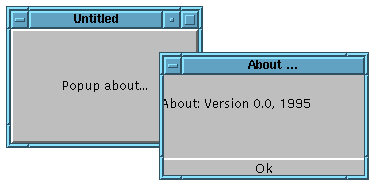
public class About extends Frame {
   About() {
      Button btn = new Button("Popup about...");
      add("Center", btn);
      btn.addActionListener(new PopupDialog());
      setSize(200, 200);
      setVisible(true);
   }
}
About Dialog (2)
class PopupDialog implements ActionListener {
   Dialog dialog = null;

   public void actionPerformed(ActionEvent e) {
      if (dialog == null) {
	 Component comp = (Component)
                          e.getSource();
	 Frame frame = (Frame)
                       comp.getParent();
         dialog = new Dialog(frame,
                         "About ...", true);
         Button btn = new Button("Ok");
         btn.addActionListener(new DownDialog());
         Label label = new
                       Label("About: Version 1.0, 1997");
         dialog.add(btn, "South");
         dialog.add(label, "Center");
         dialog.setSize(200, 100);
      }
      dialog.setVisible(true);
   }
}
About Dialog (3)
class DownDialog implements ActionListener {

   public void actionPerformed(ActionEvent e) {
      ((Component) e.getComponent()).
                     getParent().
                     setVisible(false);
   }
}
MISCELLANEOUS
Fonts
-
There are only a small number of fonts: "Dialog", "DialogInput",
"SanSerif" (was "Helvetica"),
"Serif" (was "TimesRoman"), "MonoSpaced (was "Courier"), "Symbol"
-
Font styles are BOLD, ITALIC or PLAIN
-
Font has one constructor
Font(String name, int style, int pointsize)
-
A font can be set in a Component by setFont()
Label label = new Label("Hello World");
Font font = new Font("Courier",
		     Font.ITALIC, 12);
label.setFont(font);
Graphics
-
Drawing is done using a Graphics object within a Component such as Panel
-
Drawing should be done within the
paint() method of components
   public void paint(Graphics g) {
      g.drawLine(1,1, 100,100);
      g.setColor(new Color(Color.red));
      g.drawLine(1, 200, 100, 100);
   }
Lightweight Objects
-
Lightweight objects are built purely in Java
-
They have no native-code GUI object
-
They have the same geometry model
-
They have the same event handling model
-
They are being used to develop the Java Foundation Classes
-
THE JFC objects mirror the AWT objects
-
Eventually, much of the native code stuff will disappear
Conclusion
-
AWT allows platform independent GUI applications
-
It is based on a highest common factor model
-
There are very many platform specific things that can't be done
-
There are very many platform specific practices that can't be used
-
The library is still young. The worse parts of it have been fixed
from 1.0 to 1.1
All material on this site is under the copyright restriction and
permissions of the Open Content license,
http://www.opencontent.org/opl.shtml


