dd (or any other favourite method).

This chapter was meant to be the second part of a three part series on Homenet for the Linux Journal. Very sadly, the journal closed down in August 2019 and so this was never published.
The OpenWrt site at https://openwrt.org is the entry point to all OpenWrt activities. The main alternative open source router system is DD-WRT at https://dd-wrt.com. It often includes routers not supported by OpenWrt, but is generally a bit harder to use. Several other alternatives are listed by AlternativeTo... and also by Wikipedia's List of router firmware projects
In the first part of this series I looked at enabling a typical home router for IPv6, what that looks like, and how to find out things like the IPv6 hosts on my network. This was the start of my journey to Homenet.
The consumer level routers I have at my disposal are locked down to support an assumed user level. I know the routers have the capability of acting as full computing devices, but the vendors have chosen to remove those capabilities from me. I saw this with IPv6, and to go beyond that will be harder still.
For example, a simple thing: one of the things that I can't seem to find is what IPv6 prefix is being given to my Linksys EA6900 router. On the LAN side the router hands out a /64 prefix via router adverts and each node creates one or more IPv6 global addresses from that. But to do subnetting properly I'm going to need a bigger address space than that. A /56 would be good, and then I can have upto 28 subnets, which will keep me going for a while. By email, my ISP informed me that they have given me a /56, so they are doing the right thing.
But since I can't find this information from my standard router, I either have to make it non-standard, or replace it with one I can control.
The OpenWrt project (which forked to the LEDE project but has since merged) can turn my router into an open source Linux router that I can control through an ssh or web interface. Cool, but I want a more failsafe method than just flashing the firmware on my only internet gateway and trusting it works. Paranoia may be justified sometimes!
The Raspberry Pi (RPi) is the obvious solution to building a custom router and so I will go that way. Once I have it stable, I can maybe look at re-flashing my Linksys router.
OpenWrt supports an enormous number of routers and has pre-prepared images
for many of them. The first task is to sort out which image you need to download.
From the home page, select "Supported Devices" from the menu on the left.
This will show a list of tables, and select from that
"Where can I download OpenWrt firmware for my router?"
This will bring up an extensive list. Search this list
for your router. In my case, for the Raspberry Pi 3 B+.
The 8th column will say the principal Target, here brcm2708 and
in the 9th column the Subtarget, here brcm2710. The 10th column
takes you to a download directory, and select the ext4 image.
Download this, gunzip it and copy it to an SD card for the RPi
using dd (or any other favourite method).
I adopted the approach of getting the new router to work as a secondary router to my main one. Once that is done, swap them over so that the new router is connected to my ISP. Then the old router is a secondary router to the new one. That way, I get much of the configuration done while the old router is in place and unaffected. Then by swapping them over, I leave all my old devices connected to the old router. I can gradually move them around with minimal upsets to the rest of my household!
When OpenWrt is booted up on the RPi, it assigns the IPv4 address 192.168.1.1 to the RPi's ethernet card as a static address. If you don't have anything else in your network using that address and are on the same 192.168.1.0/24 network, then plug it into your network using the ethernet port and ignore these next steps. If you do, then it gets a bit more tricky. I did have something on 192.168.1.1, so I attached a keyboard and screen to the RPi (easy to do with the RPi, not so easy with general routers!).
Then either directly or via ssh, log in as user 'admin' and
password '1234' and edit the file
/etc/config/network. Assuming your current router is
handing out addresses locally
using DHCP, change
the 'lan' interface from the default configuration
config interface 'lan'
    option type 'bridge'
    option ifname 'eth0'
    option proto 'static'
    option ipaddr '192.168.1.1'
    option netmask '255.255.255.0'
    option ip6assign '60'
config interface 'lan'
    option ifname 'eth0'
    option proto 'dhcp'

Really, the interface should have been changed from 'lan' to 'wan'. But that would put internal services inside of the RPi's new firewall and then you can't ssh into or get web access to the router from outside on the existing network without changing firewall rules. So leave it as 'lan' for now.
Don't try setting up wireless yet, because later I will be configuring this as a wireless access point to a different wireless network.
The RPi only has one ethernet port and we are using that already.
Eventually, that will be the WAN port.
Most home routers have several ethernet
ports on the LAN side. To extend the RPi,
I decided to add a USB to ethernet adaptor (shields are also available).
I bought an ASIX Electronics Corp AX88772B, sold under the brand name Astrotek.
I plugged it in, attached a live ethernet cable and saw ... nothing.
The command ifconfig -a could not see it.
So I needed to find out what USB devices I have, but
lsusb is missing from the standard OpenWrt image.
To fix that use the OpenWrt
package manager opkg which behaves like other managers such as
dpkg,
      opkg update
      opkg install usbutils
lsusb to see the adapter.
But there is no appropriate ethernet driver loaded. Hmmm, what is it?
Plug it into a normal Raspbian system and see what lsmod tells me is needed.
Actually, a web site told me I needed kmod-usb-net-asix. So
opkg install kmod-usb-net-asix
eth1.
Finally! I can use one side as the WAN connection, plug upto four
USB-ethernet adapters and use WiFi for other devices.
Actually, rather than many USB adapters, it is cheaper to buy a 5-port
unmanaged layer 2 switch and plug that into the new ASIX ethernet port.
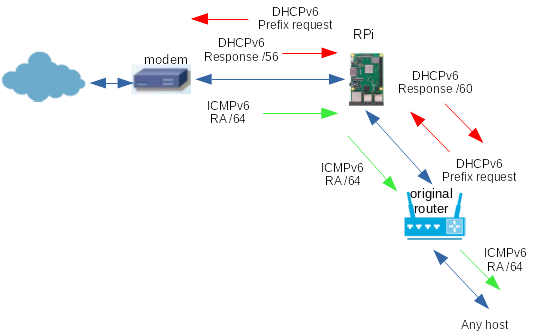
I'm part way towards
the RPi as router! It looks like Figure 3
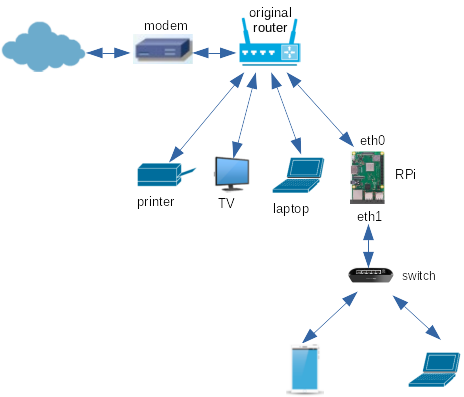
(I won't show the switch in later figures for simplicity.).
Now we can configure the new ethernet interface and wireless to act in
a new network. I chose 192.168.3.0/24 for my new network
as my original network was a
192.168.1.0/24 network and I was already playing with another
router on a 192.168.2.0/24 network.
So I need to configure eth1 as a DHCP server,
set up a wireless SSID, and bridge the new wired and wireless networks
together.
A lot of this can be done using the GUI interface (called Luci) to OpenWrt, or by
directly editing the configuration files.
~tore at
Making a Homenet router out of OpenWrt
shows how to do this using the GUI.
If you want to edit the files directly, vi
(vim) is there, or you can download a simpler
editor such as nano or several others
(not emacs though!).
Whichever way is used,
you should end up with configuration files similar to these with changes highlighted in red:
/etc/config/network:
config interface 'loopback'
	option ifname 'lo'
	option proto 'static'
	option ipaddr '127.0.0.1'
	option netmask '255.0.0.0'

config interface 'wan'
	option ifname 'eth0'
	option proto 'dhcp'

config interface 'lan'
	option proto 'static'
	option ifname 'eth1'
	option ipaddr '192.168.3.254'
	option netmask '255.255.255.0'
        option gateway '192.168.1.254' # this is the internet g/w
        option type 'bridge'
config dnsmasq
        # no changes in this (long) section
        # so not included

config dhcp 'lan'
        # no changes

config dhcp 'wan'
	option interface 'wan'
	option ignore '1'

config odhcpd 'odhcpd'
        # no changes


config dhcp 'eth1'
	option start '100'
	option leasetime '12h'
	option limit '150'
        option interface 'eth1'
config wifi-device 'radio0'
	option type 'mac80211'
	option channel '11'
	option hwmode '11g'
	option path 'platform/soc/3f300000.mmc/mmc_host/mmc1/mmc1:0001/mmc1:0001:1'
	option htmode 'HT20'
	option country '00'
	option legacy_rates '1'


config wifi-iface 'default_radio0'
	option device 'radio0'
	option mode 'ap'
        option ssid 'OpenWrt'
	option network 'lan eth1'
	option encryption 'psk2'
	option key 'my-SSID-secret-key'
At the end of all this, I had a working IPv4 network 192.168.3.0/24 with both wireless (ssid is 'OpenWrt') and wired access, connected as a subnet to the original 192.168.1.0/24 network. IPv4 NAT is turned on by default, so hosts connected to the new network should be able to access the internet firstly through the RPi gateway 192.168.3.254 and then through the original router gateway 192.168.1.254. However, you won't be able to access hosts on the new network from any external network (including the rest of the home), since the firewall on the RPi will be blocking inward access.
Playing with networking configurations isn't always fun.
Debugging is often necessary, but it isn't a matter of stepping
through code, setting breakpoints, etc as in debugging an application.
You want to see what is going in the network itself, that is, what
packets are being sent around. Two standard tools for this are
tcpdump which gives a command line interface to
network traffic, and wireshark which has a GUI interface.
You can install tcpdump on the RPi router by
opkg install tcpdump
wireshark, but that isn't available
on OpenWrt. Never mind, install it on a more capable laptop or PC
that is on one of the new router's networks.
Then you can run tcpdump using ssh on the RPi router,
wireshark on the other monitoring machine,
and connect them together by a pipeline.
I run this from a PC connected 'downstream' (i.e. on its eth1 interface) from the RPi:
ssh root@192.168.3.254 tcpdump -i eth0 -U -s0 -w - | sudo wireshark -k -i -
eth0
interface and sends them to wireshark on my
monitoring computer. I will use variations on this later.
There is a little hiccup in the last command: ssh by default
wants a password, and so does sudo and they both ask at the same time.
Who gets which one?
The suggestion from OpenWrt is to
set up ssh keys so that it doesn't ask for a password.
This involves extra work, so my solution is to
first run an innocuous command on my monitoring host like
sudo ls
sudo password on my monitoring host,
and then gives a little time when I can execute
more commands without asking again. Then I only get asked for the
ssh password for the RPi router.
Wireshark is a powerful and complex tool. It takes a little while to get your head around it. Little issues like the difference in syntax between capture filters and display filters can cause headaches. It is worth spending time on tutorials such as Wireshark Tutorial for Beginners - YouTube by Anson Alexander, and other more complex ones.
There is another little wrinkle to this: the ssh
command can only run when there
is a network in place between the router and monitoring computer. On booting or
resetting the network, any existing connection is dropped, and has to be
re-established. So any network setup packets can't be seen using this.
To see all the packets, I setup a small 4-port hub between
one of the router's ports and the network I am interested in.
Then as well as the router and the network, I also plug in the
monitoring computer and just run wireshark on that
(no need for ssh, just listen on the ethernet port).
All the packets to and from the router are duplicated on all the
hub's interfaces, so I can see everything. The only drawback
is that most hubs are limited to 10Mbps, so my network will
run s-l-o-w-l-y. It can be done using a faster managed bridge,
but that requires extra configuration to duplicate packets,
and I am trying to reduce complexity!
For example, to see the conversation between the original router and the ISP's modem,
I set it up as in Figure 4.
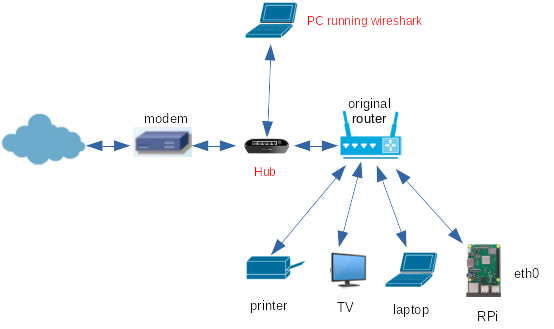
The hub can be set up between any pair of ethernet nodes.
Capturing wireless traffic is also possible but I haven't needed to do that yet. It's a lot more tricky if the wireless network uses encryption and is described at How to decrypt WPA traffic in Wireshark .
Now it's time to swap the roles of the old and new routers. To do this, we must find out how the old router connects to the ISP. Mine uses a PPPoE ethernet connection to a modem supplied by my ISP. The configuration settings can be found by digging through the menus on the old router's web page. For me, they are
      IPv4:
      Connection type: PPPoE
      username: xyz@abc.com
      passwd:   whatever
      MTU: auto

      IPv6:
      IPv6 automatic: enabled
      DUID: 00:02:03:09:05:05:C0:56:27:6F:9C:C5
      6rd tunnel: disabled
      prefix etc: empty
      MTU: auto
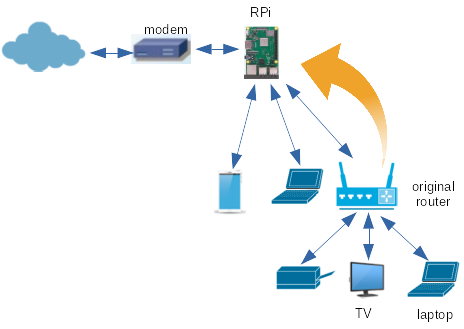
I now swap around the wiring so that my new RPi router is connected on its
WAN interface (the normal RPi ethernet interface, eth0) to the ISP's
modem, while the old router's WAN interface is now connected to the RPi
eth1 interface. The configurations now have to be changed.
For my old router, the WAN interface has to be set to dhcp
because that is what the RPi's eth1 interface will deliver.
I do that from a browser in my old home network, as nothing has been changed
on the LAN side of that old network.
For my new router, in my case it has to be set to a PPoE connection.
Copying the values from the old router and resetting some of the interface
names gives me in /etc/config/network on the RPi:
config interface 'loopback'
	option ifname 'lo'
	option proto 'static'
	option ipaddr '127.0.0.1'
	option netmask '255.0.0.0'

config interface 'wan'
	option ifname 'eth0'
	option proto 'pppoe'
	option username 'xyz.abc.com'
	option password 'whatever'

config interface 'lan'
	option proto 'static'
	option ifname 'eth1'
	option ipaddr '192.168.3.254'
	option netmask '255.255.255.0'
	option type 'bridge'
Assuming nothing has gone wrong, the RPi should now be the principal router connecting to the ISP's modem, with the old router on the subnet 192.168.3.0/24. I know mine worked fine, because I did the changeover while my partner was out for an hour, and when she returned had no complaints about "Is the network down again?". Success is demonstrated by lack of screams from the rest of the household :-)
At the end of this, I have an IPv4 network working exactly as before,
but now with an RPi as principal router. Instead of a black box
where I am constrained by the GUI interface offered by the router,
I now have a connection to my ISP where I can run tools like
tcpdump to see who is doing what on my network
and generally have a standard Linux box to play with.
Actually, it's only me screaming: I run a web server out of my home, and that is now buried down below my old router. It was accessible by NAT port forwarding, but now it is in the wrong place. I need double-NAT from my new router to the old router. Except the old router has gone into a sulk and exposes no open ports to the new router ("all ports are filtered"). This is a problem with no obvious solution, so the simplest thing is to move the web server to the new network. It's a wired device, an HP Proliant Microserver which is still going great guns after several years. The simplest solution was to move the server from the old router's network to the new router's network by swapping the ethernet cable from the old router to the new one.
It's an IPv4 network at present. To make the server visible externally, I need to use
port forwarding.
Port forwarding is done using the router's firewall configuration file
/etc/config/firewall. I added the following lines
to this file, to forward HTTP and HTTPS traffic:
config redirect
	option target DNAT
	option src wan
	option dest lan
	option proto
	option src_dport 80
	option dest_dport 80
	option dest_ip 192.168.3.216
	option enabled

config redirect
	option target DNAT
	option src wan
	option dest lan
	option proto
	option src_dport 443
	option dest_dport 443
	option dest_ip 192.168.3.216
	option enabled
/etc/init.d/firewall restart.
This can all be done from the OpenWrt web GUI, but I prefer to dig around at the
command line level.
This was a serious problem, in that sometimes the PPPoE connection to my ISP from the RPi wouldn't get set up. With the above OpenWrt configuration files, I should see the interfaces
Sometimes the pppoe-wan interface never showed up, and I had no internet connection. This almost always happened when trying to set up IPv6 and so looked like an OpenWrt configuration issue. But after much investigation and assistance in the OpenWrt forum IP breaks using @wan instead of eth0 , it seems to be either a hardware issue with the ethernet card or perhaps an issue with the ethernet driver.
When the pppoe-wan interface doesn't show, running /etc/init.d/network restart
would fix it - but sometimes up to 10 restarts needed! I don't have a solution
as yet, but I have a workaround: swap the two ethernet cards.
That is, make eth0 the LAN side and eth1 the WAN side.
It's a quick edit on the different configuration files.
Different hardware and
driver now on the WAN side, and the problem disappeared.
Yes, it's a hack, but well, it works so far.
The RPi isn't designed as a router, so you can't expect it to behave like one dedicated to that purpose. The standard ethernet device is actually a USB device, so it shares the USB bus with any other USB devices. Nevertheless, it should be able to achieve upto 100Mbps. Let's see what it does.
I installed speedtest-cli. This is a Python script, so you
may need to go through
	  opkg install python
	  opkg install python-pip
	  pip install speedtest-cli
speedtest-cli you may get the error
$ speedtest-cli
Retrieving speedtest.net configuration...
Cannot retrieve speedtest configuration
ERROR: <urlopen error [SSL: CERTIFICATE_VERIFY_FAILED] unknown error: unable to get local issuer certificate (_ssl.c:1051)
export PYTHONHTTPSVERIFY=0
My ISP connection is 75/75Mbps up and down, and I usually get close to that. From the new router, I get 73.50/70.43Mbps, so the ethernet interface is performing okay. From a PC connected to the new router by wireless, it isn't so good: 42.59/27.99Mbps. From a PC connected to the new router by ethernet cable, 79.56/65.90Mbps. So within the constraints of my home connection to an ISP, that is okay. If you have a faster connection, then you will clearly want a faster router. Also, the wireless on the RPi is not particularly powerful, so if your home is large you might lose connections or speed. Most commercial home routers seem to lose the plot if there are more than 30 wireless nodes connected. I don't have 30 to play with in my home (yet), but doubt if the RPi could handle that many.
Note: my speeds are achieved by using a wireless ISP provider, Lightning Broadband. The much touted Australian NBN (National Broadband Network) has proved to be a disappointing waste of money from a Government that destroyed the original idea of fibre to the home, and even quite recently claimed that 25Mbps was good enough for everybody. I see no value in going backwards but wish I could go forwards to the Gigabit speeds seen in even our nearest neighbour, New Zealand!
I've left IPv6 out of this so far as just replicating the original environment is complex enough. But from here, setting up IPv6 isn't hard at all. I'll make it simple IPv6 - what happens for Homenet will be discussed in the next article in this series.
First, let's look at the IPv6 network information given by the ISP.
To remove most of the irrelevant packets, start wireshark from a PC
looking at packets from the hub between the router and the ISP modem, with a
display filter set to icmpv6 || dhcpv6.
A global IPv6 prefix is given out by router adverts from the ISP
to the multicast address ff02::1. See Figure 6,

with details in Figure 7.
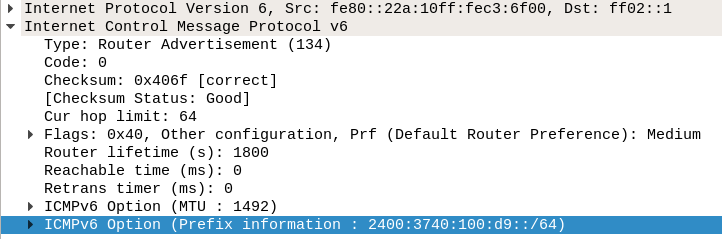
The source of the advert is the ISPs router (using its link local address).
It also includes
a /64 prefix of 2400:3740:100:d9::/64, which is used by
recipients such as my edge router to allocate themselves a GUA on the ISP side.
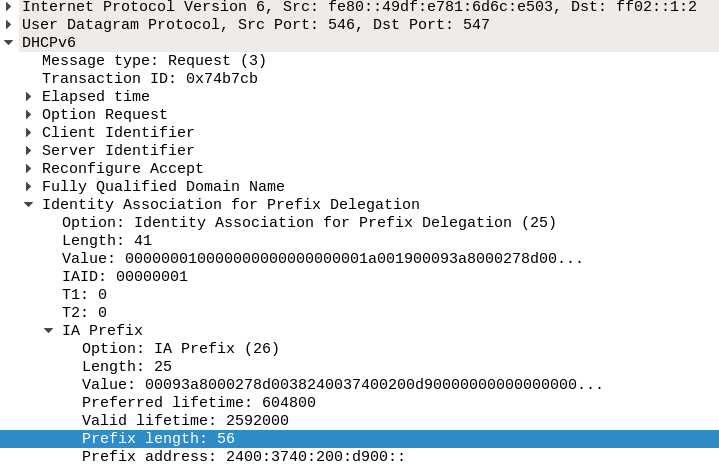
A prefix request is made by a DHCPv6 Request from my router to the ISP
(actually, to anyone who is listening to the multicast address ff02::1:2).
See Figure 8,

with details in Figure 9.
The response from the ISP is the packet shown in Figure 10.

The details of this packet are shown in Figure 11
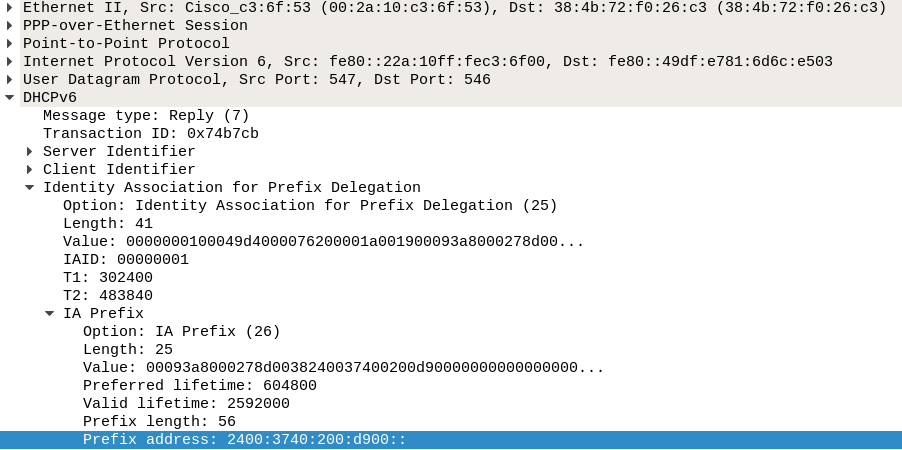
This offers from the ISP a /56 prefix 2400:3740:200:d900::/56.
Our router can then use this to offer addresses within this range to its own LAN clients.
Please note that the /64 offered by the ISPs Router Advert and the /56 from the DHCPv6 reply to the prefix request are disjoint: 2400:3740:100:d9::/64 versus 2400:3740:200:d900::/56. This is good practice by my ISP: if my router took an address from within the /56 range, it would in effect have "stolen" one of the addresses from use in my router's LAN, and that would be against the idea that my router has complete use of the /56 on the LAN side>.
The ICMPv6 router adverts and the DHCPv6 requests and responses for
multiple routers overall are given in Figure 12
(There are actually earlier steps of the client sending a Solicit message
and the router replying with an Advert, omitted for simplicity.)
We need to configure the new router to handle these messages and also to pass on relevant information to its own clients. Clients will assign themselves a link local address anyway. With the prefix information passed to them from the ISP via the new router they will be able to generate a GUA. But it would also be good for the router to send to clients a ULA prefix so all nodes can communicate with each other in the home network.
The principal change is to the OpenWrt file /etc/config/network
on the new RPi router.
This now needs a wan6 section to handle the messages from the
ISP. The change is easy: just add these lines to the file:
config interface wan6
    option ifname '@wan'
    option proto dhcpv6
eth0 (or whatever the interface is)
or @wan. Not so, at least not when we are using PPPoE.
If we use eth0 then DHCPv6 packets go out over the
eth0 interface.
But they need to go out over the pppoe-wan interface.
So the wan6 interface needs to be mapped to whatever
the wan interface is, by using @wan.
We also add the line
option ipv6 '1'
wan section, and
option ip6assign 59
lan section. This ensures that proper router adverts
get passed to the clients, in particular to the old router and its
clients. I've changed the earlier value of 60 to 59 because the behaviour of odhcpd
seems to be different to the documentation. From an
OpenWrt forum discussion
odhcpd gets wrong prefix from DHCPv6 SOLICIT messages
'jow' says
The odhcpd server will never hand out the entire downstream prefix on client requests but will always try to partition it into at least two halves.so if we want a /60 prefix handed out, we need to set
ip6assign to 59.
We can add in the ULA addresses by also adding to this file a random ULA prefix
config globals 'globals'
    option ula_prefix 'fd87:5070:a96b::/48'
The /etc/config/network file finally looks like
config interface 'loopback'
	option ifname 'lo'
	option proto 'static'
	option ipaddr '127.0.0.1'
	option netmask '255.0.0.0'

config globals 'globals'
	option ula_prefix 'fd87:5070:a96b::/48'

config interface 'wan'
	option ifname 'eth1'
	option proto 'pppoe'
	option username 'uer name'
	option password 'password'
	option ipv6 '1'

config interface 'lan'
	option proto 'static'
	option ifname 'eth0'
	option ipaddr '192.168.3.254'
	option netmask '255.255.255.0'
	option type 'bridge'
	option ip6assign 59

config interface wan6
	option ifname '@wan'
	option proto dhcpv6
You may also need to add an entry to the /etc/config/firewall
file, unless it is already there:
config rule
	option name 'Allow-DHCPv6'
	option src 'wan'
	option proto 'udp'
	option src_ip 'fc00::/6'
	option dest_ip 'fc00::/6'
	option dest_port '546'
	option family 'ipv6'
	option target 'ACCEPT'
At the end of all this, the new router gets an IPv6 address
of 2400:3740:100:d9:3d04:ccc0:5160:2c6d/64 on the WAN side,
2400:3740:200:d900::1/60 on the LAN side, and broadcasts
router adverts to its clients shown in Figure 13
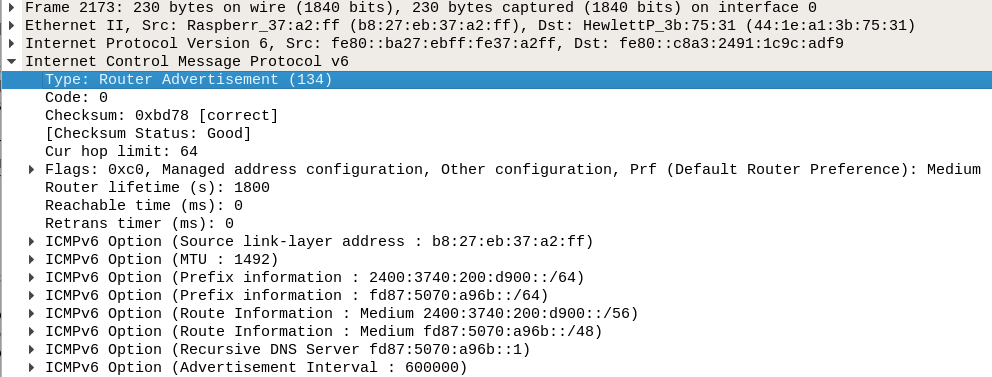
with /64 prefixes for the GUA and ULA of each node.
Each node can then use these for SLAAC or DHCPv6 assignment of their
addresses. The message also includes a /56
for GUA subnetting and a /48 for ULA subnetting.
At the end of all this, one node on the new router's network sees IPv6 addresses
    inet6 2400:3740:200:d900::858/128 scope global
    inet6 fd87:5070:a96b:0:2150:6480:8d6a:7565/64 scope global temporary dynamic
    inet6 fd87:5070:a96b:0:224:21ff:fe43:4aed/64 scope global dynamic
    inet6 2400:3740:200:d900:2150:6480:8d6a:7565/64 scope global temporary dynamic
    inet6 2400:3740:200:d900:224:21ff:fe43:4aed/64 scope global dynamic
    inet6 fe80::224:21ff:fe43:4aed/64 scope link
On the old router, which is now on a subnet of the new router, we see on its client side
    inet6 2400:3740:200:d904:224:21ff:fe43:4aed/64 scope global deprecated dynamic
    inet6 fd87:5070:a96b:4:2150:6480:8d6a:7565/64 scope global temporary dynamic
    inet6 fd87:5070:a96b:4:224:21ff:fe43:4aed/64 scope global dynamic
    inet6 fe80::224:21ff:fe43:4aed/64 scope link
My web server is on my home network and should be visible externally. The mechanisms to do this are different for IPv4 and IPv6. Earlier, I showed how to this for IPv4 using port forwarding. Now I have to set up an IPv6 firewall rule to allow external hosts to connect to the server.
OpenWrt uses iptables by default. This can be immensely complicated,
but we don't need to go into the horrors. Simply ACCEPT
suitable packets for my server with GUA 2400:3740:200:d900::26:
config rule
	option src wan
	option proto tcp
	option dest lan
	option dest_ip 2400:3740:200:d900::260
	option dest_port 80
	option family ipv6
	option target ACCEPT

config rule
        option src wan
        option proto tcp
        option dest lan
        option dest_ip 2400:3740:200:d900::260
        option dest_port 443
        option family ipv6
        option target ACCEPT
There is a significant difference between IPv4 port forwarding and IPv6 firewalling. Under IPv4, you could have many services on many hosts inside your network, all with a single external IPv4 address using NAT. Under IPv6, each host has (at least) one distinct IPv6 GUA. So to access services on different internal hosts from external hosts, you will need to go to different IPv6 addresses.
I use an external DNS provider Zoneedit for my domain jan.newmarch.name. In the last article I talked about making these visible on the global DNS. There are no changes to the process described there.
For services runing inside your network to be visible outside, they will generally need to have static IP addresses. For IPv4 services, the static IP is the WAN address of your gateway router as it uses NAT to map external requests to internal hosts. But for IPv6, you need the GUA of the host with the service to stay static.
You may be changing routers, so you don't really want the router to be in charge of the internal hosts IPv6 addresses. The page IPv6 addressing, dynamic prefix static local part describes how to do this using the Linux NetworkManager, but I couldn't get it to work. That is, I got it to add a fixed suffix to the prefix, but only as a /64 and it needed to be a /128.
I did get fixed IPv6 addressing by the OpenWrt router working by setting DHCPv6 parameters in
/etc/config/dhcp:
config host
	option name 'server'
	option dns '1'
	option mac '44:1E:A1:3B:75:31'
	option hostid '260'
	option ip '10.208.0.2'
	option leasetime '12h'
        option duid '0004d946de693def512ab5f4ee58409f88d1'
DNS (domain name server) allows us to use names like www.google.com
instead of the IP addresses. For IPv4 it is working fine. For IPv6
it is also. dig is the tool of preference for doing
command line DNS queries. Its output is a bit messy, and you
usually want to look for the ANSWER section. For example,
a simple (IPv4 lookup) of www.google.com is
$dig www.google.com

; <<>>; DiG 9.11.3-1ubuntu1.5-Ubuntu <<>> www.google.com
;; global options: +cmd
;; Got answer:
;; ->>HEADER<<- opcode: QUERY, status: NOERROR, id: 43656
;; flags: qr rd ra; QUERY: 1, ANSWER: 1, AUTHORITY: 0, ADDITIONAL: 1

;; OPT PSEUDOSECTION:
; EDNS: version: 0, flags:; udp: 65494
;; QUESTION SECTION:
;www.google.com.			IN	A

;; ANSWER SECTION:
www.google.com.		193	IN	A	172.217.167.68

;; Query time: 2 msec
;; SERVER: 127.0.0.53#53(127.0.0.53)
;; WHEN: Wed Mar 13 16:49:36 AEDT 2019
;; MSG SIZE  rcvd: 59
We can ask for an IPv6 address by specifying that we want an AAAA ('quad-A') record by
dig AAAA www.google.com
;; ANSWER SECTION:
www.google.com.		243	IN	AAAA	2404:6800:4006:802::2004
2404:6800:4006:802::2004.
Now we actually made that DNS query using IPv4 to get an IPv6 address.
To make the same query using IPv6, we need to specify the -6 flag
dig -6 AAAA www.google.com
The situation isn't quite so simple with internal hosts.
For starters, look at what the RPi router's Luci interface gives you
when you go to the router's web page,
shown in Figure 14
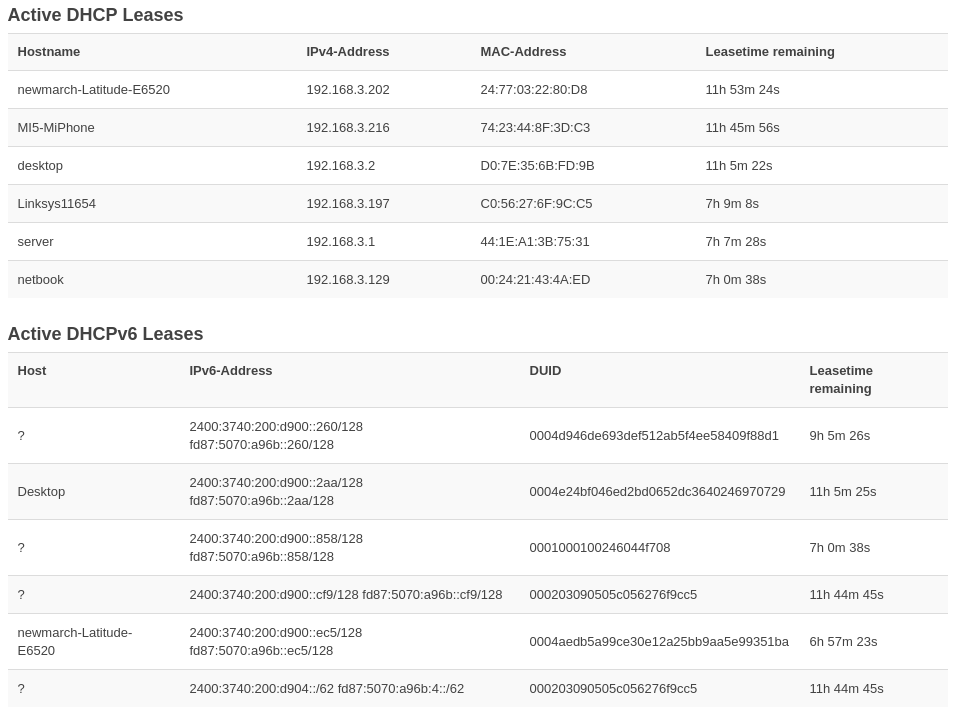
OpenWrt sets up the local DNS to have the domain .lan,
and any hostname with no domain given belongs to that domain.
Using dig these all
return valid IPv4 addresses in the .lan domain
OpenWrt.
I've set up DHCPv4 fixed address entries for only two of these:
server and desktop.
The other host names are presumably coming from the hostname parameter
in the DHCP requests and responses between clients and servers,
as given in RFC2132.
For DHCPv6, no fixed IP addresses are assigned by me. So the only two entries are presumably coming from the DHCPv6 requests for the host name as per the IETF draft Options for DHCPv6 . The other nodes are not supplying anything.
dig AAAA ... works on the two hosts
Desktop and newmarch-Latitude-E6520
but not on any others.
Not so good, eh! But to the rescue comes
ip6neigh
which uses IPv6 neighbour discovery to populate a host file
which it hands to the DNS server dnsmasq.
It classifies the addresses it discovers into LL, MAN, GUA and TMP.GUA
addresses.
After it is run, you can see the addresses it creates by
ip6neigh list all which gives something like
newmarch-Latitude-E6520.LL.lan fe80::8d6:8384:320e:ec12
newmarch-Latitude-E6520.TMP.GUA.lan 2400:3740:200:d900:55b6:57a2:be8e:4739
newmarch-Latitude-E6520.TMP.lan fd87:5070:a96b::55b6:57a2:be8e:4739
Linksys11654                   fd87:5070:a96b::c256:27ff:fe6f:9cc5
Linksys11654.GUA.lan           2400:3740:200:d900:c256:27ff:fe6f:9cc5
Linksys11654.LL.lan            fe80::c256:27ff:fe6f:9cc5
Linksys11654.MAN.lan           fd87:5070:a96b::10a
...
	  dig AAAA newmarch-Latitude-E6520.LL.lan
	  dig AAAA newmarch-Latitude-E6520.TMP.GUA.lan
	  dig AAAA newmarch-Latitude-E6520.TMP.lan
I started up a web server on the newmarch-Latitude-E6520
machine, and using the url
http://newmarch-latitude-e6520.tmp.gua.lan/
was able to connect to it from other internal hosts.
I've installed an extension
IPvFoo to the Chromium browser which gives me an indication as to whether it has
connected via IPv4 or IPv6 (a '4' or '6' in the extensions bar)
and it confirms I have connected by IPv6.
One of the keys to IPv6 addressing is how it allows (or not) routing from one network to another. For LL (link local) addresses, routing to another segment is not allowed. For ULA (unique local addresses), routing within the organisational boundaries (here the home) is allowed. For GUA (global unique addresses) routing to and from any IPv6 address is allowed - all this subject to firewalls of course!
At the moment we have an RPi as edge router to the internet with the Linksys home router still with its original firmware as a subnet. Not much to do routing with yet!
The Linksys doesn't want to play ULAs at all. It won't allow ping6's to ULA addresses either way across its segment boundary. It will allow ping6's from its own clients to any GUAs on the internet, so it's not totally bad :-). It's just not set up to handle multiple IPv6 networks.
So I set up another RPi as client router to my RPi edge router, just as I did originally with the RPi to the Linksys router. The only change I made was to the SSID for this second RPi to avoid confusion with the first RPi's wireless network.
With clients on the two RPi OpenWrt networks, everything was fine: I could ping6 ULAs between any two nodes on the networks. Of course, this isn't a large network requiring heavy duty routing algorithms - but that is where Homenet expects home networking to go, and will develop user-friendly routing algorithms.
This article has discussed installing the OpenWrt system onto an RPi. While I have mainly used command line tools, the Luci web interface allows most of the configuration to be done using a web GUI. What you get is an open Linux system rather than a locked-down proprietary router and that to me is always a good thing - with more and more devices coming onto my network, I have become progressively more uneasy as to what they are all doing, and this gives me the means to find out.
The next article will talk about the Homenet system, and how this gives you even more visiblity - but also control - over increasingly more complex home networks.